Friday 24 October 2014

Task Eight - Using Continuity Editing Techniques


In our sequence we use a range of continuity editing techniques to create the clip. We put in Match on Action, Shot, Reverse Shot, Eye Line Match and the 180 Degree Rule.

The first use of continuity editing is the Match on Action which we used on the door shot. We see her walking down the corridor towards the door and we see the outside of the door. Then in the next shot the camera has been moved into the classroom and we see the rest of the action but from the inside. I think that we did the Match on Action well as it runs smoothly and is continuous.

We also use an Eye Line Match when the teacher is writing on the whiteboard and then looks away. We see a shot of her writing then immediately after the camera cuts to a shot of the clock. It's hear when we see the object was looking at in the previous shot. I believe that we done this shot rarely well as we do see the teacher looking away and back again, and then we see the clock. However, i think that net time it should be a lot clearer on where a bouts the teacher is looking as some people may not realise that she is looking at the clock but rather looking at something else.

The Shot, Reverse Shot was used when we filmed the conversation sequence. We start of with a shot of the student walking in, then it cuts to a shot of the teacher asking why she's late, then we see the student again.  I think that we done the Shot, Reverse Shot fairly well as the camera does cut between the two characters and we can clearly see who's talking to who and when.

Finally, throughout the sequence we have kept to the 180 Degree Rule and have not broken it at any point during the clip. The teacher is always on the right and the student is always on the left and this is continuous throughout.

Friday 17 October 2014

Task Seven - Understanding Continuity Editing

Continuity Editing is the predominant style of film and video editing. The purpose of continuity editing is to ensure temporal and spatial continuity as a way of advancing narrative, using such techniques as the 180 degree rule, Match on Action, and Shot,Reverse Shot. It was developed by early European and American directors, in particular D.W. Griffith in his films such as The Birth of a Nation. Continuity Editing is important as it helps to retain a sense of realistic chronology and generates the feeling that time is moving forward. It doesn't mean you can't use flashbacks or flash forwards, as long as the narrative will still be seen to be progressing forward in an expected or realistic way.

The first type of continuity editing is Match on Action. This is when you start an action in one shot and finish it in the the next. A filmmaker may use this as it creates a continuous shot and you can film the same shot twice and then put them together. By doing two shots you can change the position of the camera without altering the continuity of the shot. An example would be when someone walks through a door. The camera can be placed outside the room filming the character going in, then in the next shot you can move the camera into the room and watch the character entering the room. When using Match on Action, the camera operator and the character must ensure that everything is in the same position in both shots. If a filmmaker didn't use Match on Action to film a shot like this, it would create a jump shot, and therefore it will not be continuous. The audience are likely to get confused if they do not see the full extent of the action.

Another type of continuity editing is Eye Line Match. This is when you see the character looking at something off screen, leaving the audience to wander what they are looking at, then in the next shot the camera cuts to the person or object the previous character was looking at. Filmmakers may want to use this as it creates a sense of mystery within the audience as we are left wandering what the character was looking at. They may also want to use it to create an element of shock and tension. If the audience can't see what the character is looking at then they begin to question the situation and start to formulate their own understandings. If a filmmaker didn't use Eye Line Match then the scene wouldn't create as much tension as we'd be able to see the whole scene just as the characters can.

Shot, Reverse Shot is also a useful style of continuity editing. This type of shot is usually used in scenes where a conversation takes place. It's when the camera changes between faces and we see a shot of one character looking at another character, then we are shown the other character looking back. A filmmaker might want to use this as it makes the audience feel like we are the ones talking to the characters, creating a sense of empathy. Changing the shot creates a focus on the particular characters rather than being shown the whole scene. It keeps the audience engaged with what is going on to. If filmmakers didn't use Shot, Reverse Shot then the audience may start to become bored as it would be one continuous shot throughout. Also, if it isn't used then the audience may not hear important information and this may lead to confusion further on in the film.


The last technique of continuity editing is the 180 Degree Rule. This is the positioning of the camera in scenes where we see different characters, usually communicating with each other. During this communication the camera operator must make sure that the camera stays on one side of the imaginary axis ensuring that the characters on the left and right stay on the left and right sand don't switch places. Filmmakers may use the 180 Degree Rule to enable the audience to visually connect with the movement happening around the characters. If a filmmaker didn't us it then the scene would create disorientation and confusion within the audience as the perspective is altered. The only time it is suitable to break the rule is if the director purposely wants it broken to enforce confusion and disorient in the audience to foreshadow danger or change.

 An example of when this 180 Degree Rule is purposely broken is in The Shining.

Thursday 16 October 2014

Task Six - Creating a Montage

The first style of Montage we created was a Hollywood Montage which is when you condense the clips of a whole day into a short sequence that shows everything in a shorter amount of time. We used the Rocky clip as inspiration for our own Hollywood Montage. The idea behind it is to include different aspects of a certain thing.


The intention behind our Montage was to film the main parts of a school day and condense them into one short clip that sums the day up. Doing this means that we could pick out the most important parts which sum up the day. The Montage creates meaning if someone, who is not at school, is watching it they can see the main elements of a school day in a short amount of time. The use of the song in the background makes the video seem like it is going quicker as it is quite upbeat and keeps the audiences attention.

I believe that our video is a successful example of a Montage as it does everything that a Hollywood Montage should do. It is successful because you can clearly see what is happening in the video and it is easy to understand the point of it, to show a school day in a short amount of time.


The second style of Montage we created was a Soviet Montage. This is when you juxtapose two different shots that did not exist in either shot alone and put them together to create a deeper meaning.

The intention behind the Montage was to show the images of a student having problems with bullying. Filming this in the style of a Soviet Montage meant that we could juxtapose two different shots which wouldn't normally be related to emphasise the life of the student. It creates meaning as the audience can see clearly how the main character is feeling and whether or not she deals with her problems.

I believe that our example of a Soviet Montage was successful because the different shots relate well to each other even though they were completely non related. The audience can clearly see what the intentions of the film were.

Wednesday 15 October 2014

Task Five - Understanding Montage Theory

A Montage is the technique of selecting, editing and piecing together separate sections of a film or short clip and putting them together to create a continuous whole. There are three main forms of Montage; The French Montage, Hollywood Style Montage and a Soviet Montage.

A French Montage literally means to 'assemble' a film or clip. Therefore, in French Film the term simply identifies the process of editing. A Hollywood Montage is when the film maker picks out the most important/main clips of something and then condense them into a short sequence that shows all these clips. Doing this creates different aspects and condenses a long narrative sequence into a shorter one. Finally, a Soviet Montage is when the film maker juxtaposes different shots that didn't exist in either shot alone to create a new, deeper meaning. Usually the two different shots contrast with each other but bring the film together to reveal the hidden meaning.

Two key film makers who were famous for their montages are Les Kuleshov and Sergei Eisenstein. Les Kuleshov is famous for the Kuleshov Experiment which is when he used the same image of a man and compared it to three other random pictures.

Lev Kuleshov

Kuleshov Experiment


A Hollywood Montage is when you make a short film which shows all the most important parts of a certain thing, such as a day. A famous example is the training scene from Rocky. In this clip we see Rocky training but instead of filming the whole thing we are only shown the most important parts of the day. As the audience we can see it is a whole day as the clip starts of with Rocky running in the morning, and then by the end of the clip we can see from the background light that it is the evening/end of the day. 


Sergei Eisenstein is also an important filmmaker as he introduced us to the Soviet Montage. Sergei's first feature length film was called Strike in which he shows a video of the suppression of the strikers and then cross-cuts it to shots of cattle being slaughtered. The idea of this was to show the audience the way in which these strikers were treated. 


Thursday 9 October 2014

Task Four - From Analogue to Digital Editing

There are many different types of editing that can be used to create a film or clip. Over the years, however, these have changed and we now only really use one type of editing, Digital.

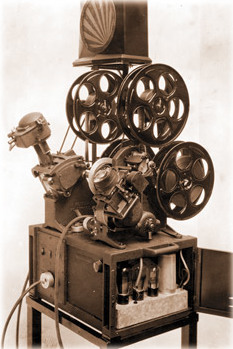
Analogue editing is the cutting together of pieces of celluloid film and then putting them in the order that is needed. Traditionally films were made up of a collection of pictures printed on to acetate negatives, and these images were then spliced together to create a reel of film. These reels of film are then fed through a projecter at a constant speed of 24 frames per second, which in turn makes the pictures look like they are moving and living. The traditional ways of editing these films was by the use of The Moviola, which was invented in 1924 by Iwan Serrurier.. The Moviola was the first device that allowed a film editor to view the film and edit it simultaneously. This was the first machine used for feature length motion picture editing.


Another form of editing is Video Editing. This type of editing was around before technology became available, when magnetic tapes were used to store information, most people knew these as Video Tapes (VHS). Video Editing is the process by which segments of these tapes were edited using a device that mechanically puts pieces of video tape together. This method requires the editing to be done in the correct order first time round to avoid mistakes. This is also known as Linear Editing.

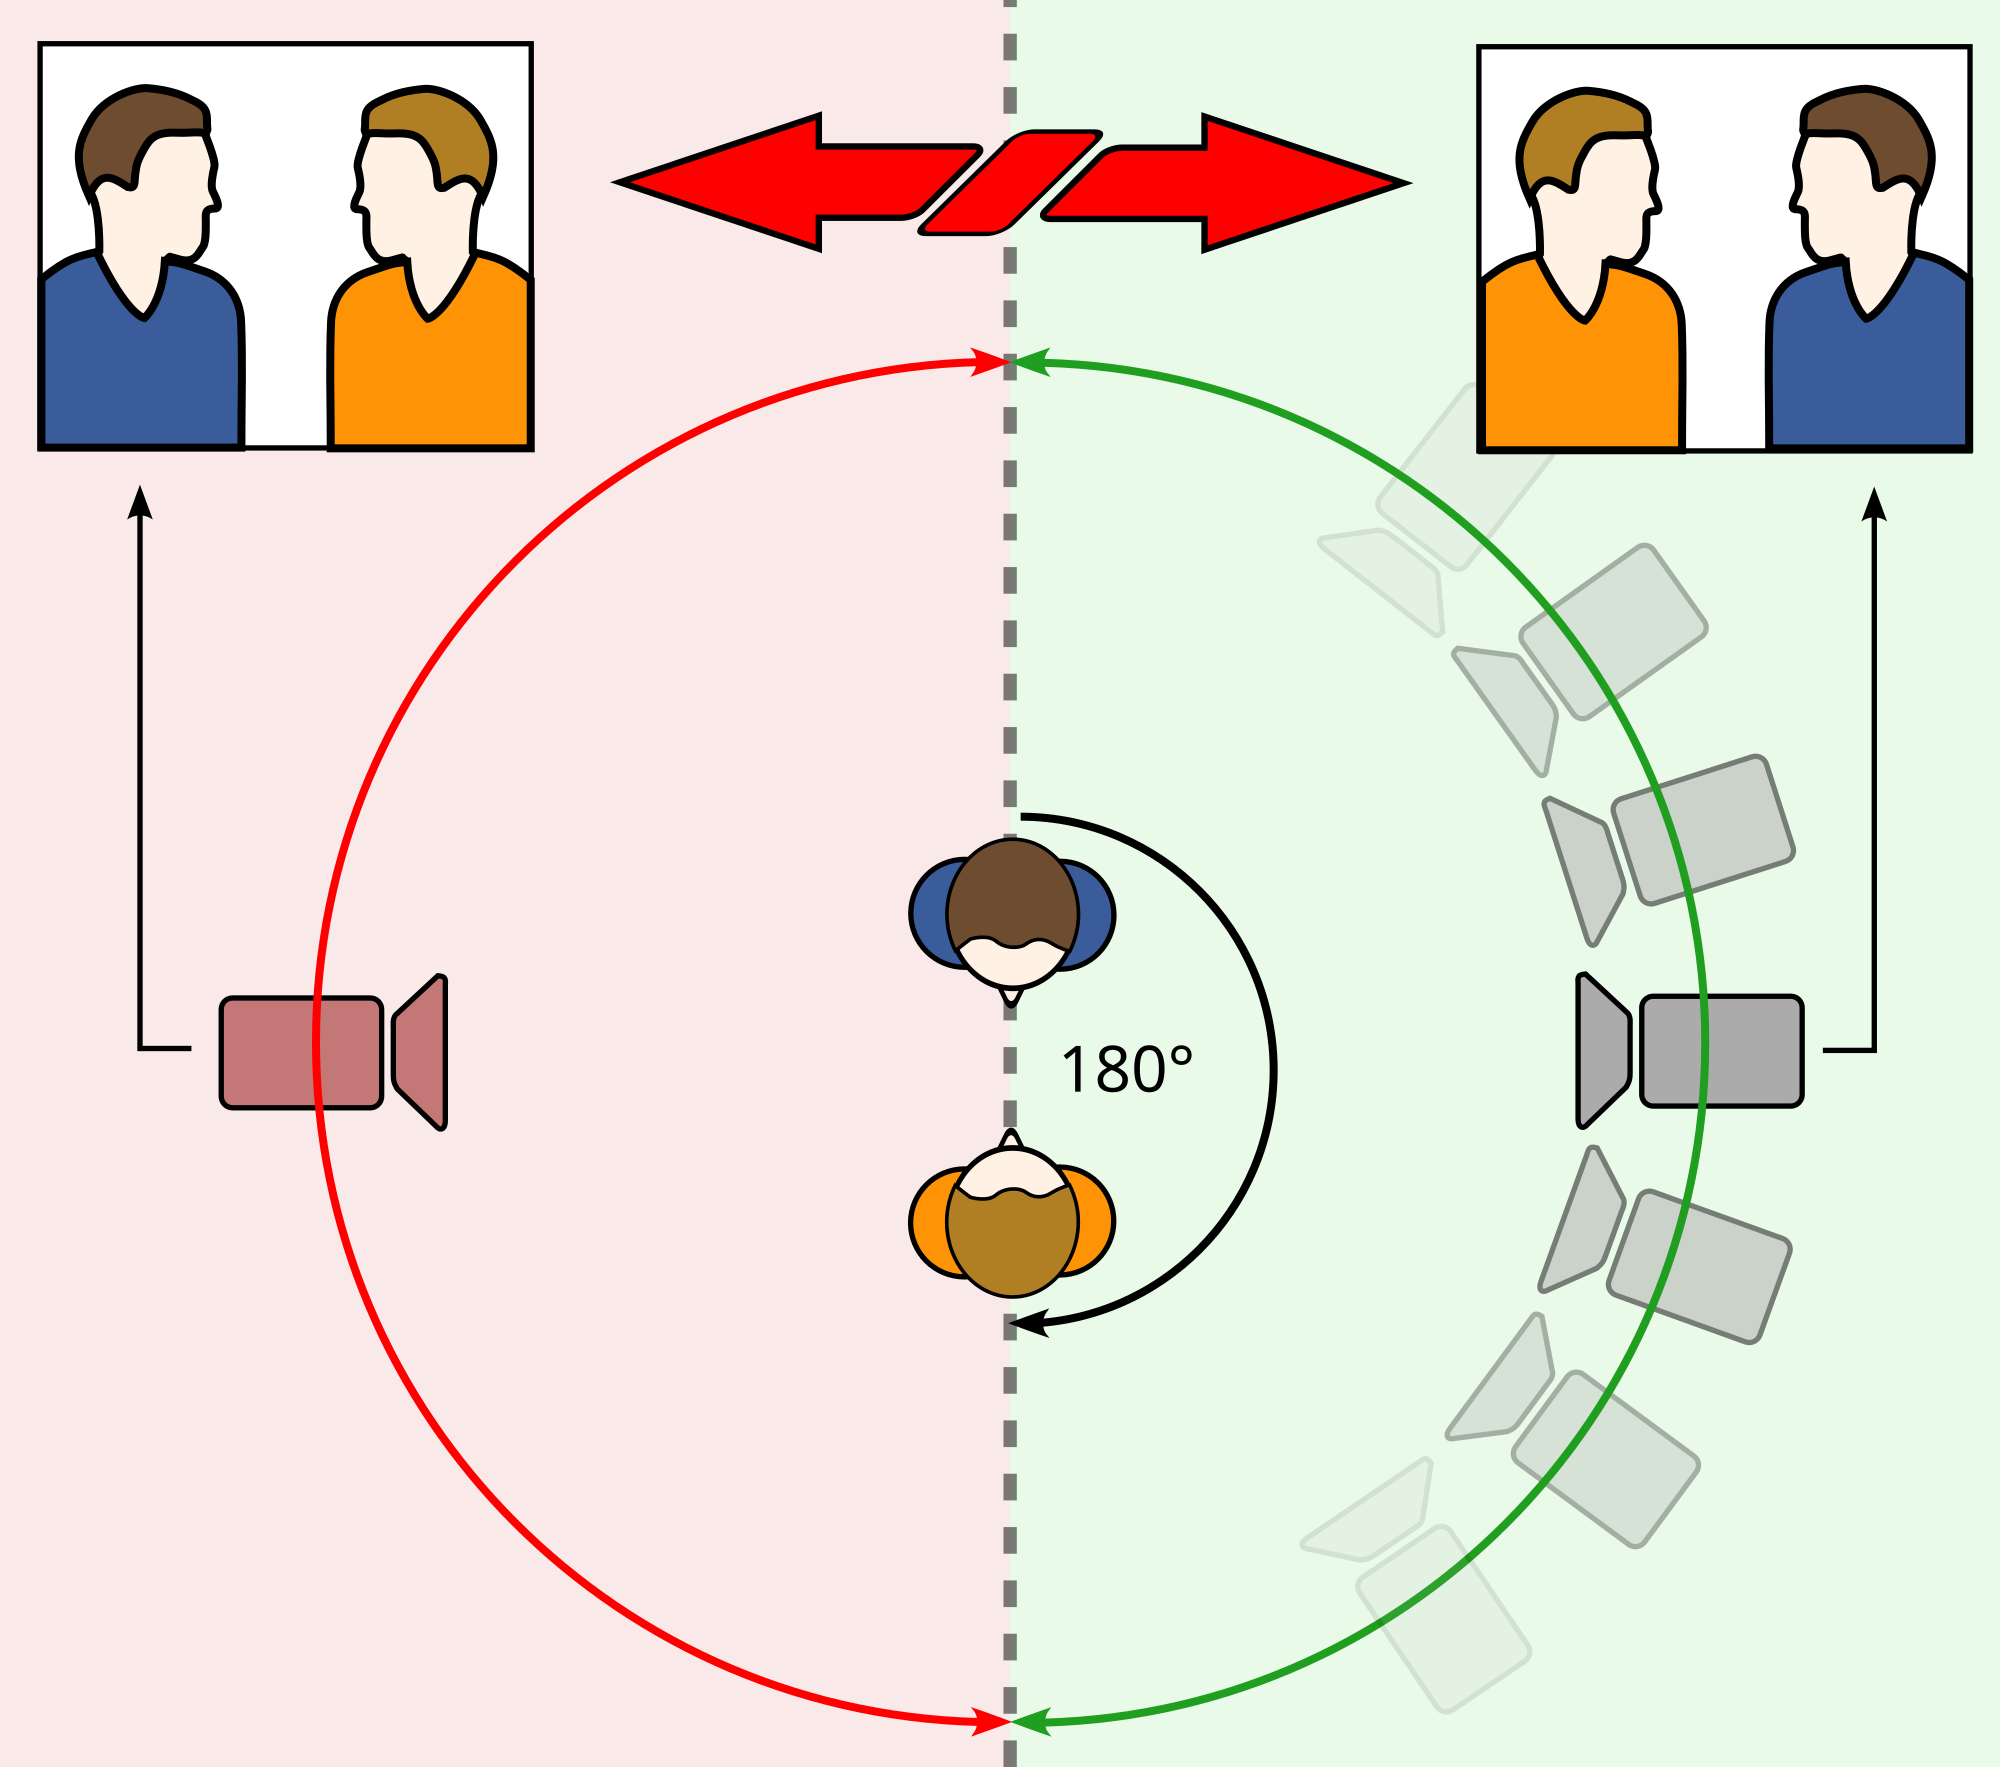
Digital Editing is the most common form of editing nowadays and it is a form of electronic media where the data is stored in digital form, as opposed to the previous methods of analogue editing. Digital Editing is the use of computers to order and manipulate this digital data. This can be done through the use of many different programs such as Adobe Premier, Avid and Final Cut Pro. The way Digital film editing is done is by using bits and bytes (strings of 1's and 0's) to record, transmit and replay images, instead of the old method of chemicals on a film. Because the whole process is electronic there is no splicing involved which meant that it soon took over Video Editing as it proved to be much quicker and cheaper. The biggest pro to Digital Editing is that you can edit in any order. This is known as Non-Linear editing. This is when you can edit a sequence from the end of the film before you have started editing the first scene. This was made possible by the use of electronic files so that it made it as easy as cutting and pasting text into a word document. 

However, there are many pros and cons to Analogue and Digital Editing. The pros of Analogue editing are that it is quicker and more precise as the people responsible for filming and writing it would tend to take their time as they'd only get one shot. Another pro is that it is safer as the film isn't stored on a computer which means that the likelihood of it being damaged was low. On the other hand there were some cons to Analogue editing. This includes the fact that if you did make a mistake, you would not be able to go back and edit it, and therefore the film you've created will not be at the highest standard. Also, because there were no CD's or VHS' to carry the film around in, it meant that it was a lot to carry and could possibly be expensive and heavy. Also, communication with the person behind the camera was scarce as you couldn't edit out someone saying action for example. 

There are also pros and cons to Digital Editing. A pro is that because it is edited digitally it means you can put the clips together in whatever order you wanted and it means that you don't necessarily have to film it in the order that you want it to be shown. This means that you also get more than one chance to edit it, meaning that you can make it as good as possible. Although there are some cons to Digital Editing. For example some people may find that it is too complex for them to understand and may therefore struggle when it comes to editing their film. Additionally, because you have the ability to edit it as many times as needed, not as much effort may be put into it and it may not then be to the best of their ability. Finally, because Digital Editing relies mostly on technology, you can't always be sure that the technology you are using won't break. There is always a chance that what you edit and film may be lost if something happens to the technology.