In our video we used fades and dissolves to create the effect of manipulating diegetic time and space. The use of the dissolve creates the idea that the main character is having a flashback, remembering where she had put her phone. This is made clear to the audience through this use of the dissolve. After this dissolve the colour of the short sequence has been changed to black and white to further emphasise this change in time and space.
Wednesday 10 December 2014
Task Twelve - Transitions and Effects
There are many different transitions and effects that can be used to manipulate the diegetic time and space. This can be done through the use of transitions, graphic match, following the action, multiple points of view, shot variation and manipulation of time and space.
Transitions include things such as cut, dissolve, fade and wipe. Transitions are used carefully as different transitions can mean different things to the audience and it is therefore important to use the right one. A Straight Cut is the most common form of transition and it is virtually 'invisible'. One shot moves instantaneously to the next without attracting the attention of the audience. Using straight cuts are helpful as they help to retain reality. They are mostly used in continuity editing as they don't break the viewers suspensions of disbelief, in other words their willingness to accept what's happening.
The next type of transition is a Dissolve, this is when one shot is faded off the screen whilst another shot is fading in. When using this, the audience will be able to see both shots at the same time, at the mid-point of the dissolve. This is an effective transition as it suggests that the two shots are connected in some way, it could be anything from two characters to two places or objects. It can also be used to suggest that some time has passed between shots.
Fade is also an example of a transition, this is similar to a dissolve but instead of dissolving one shot into another a fade is a gradual darkening or lightening of an image until the screen becomes black or white. Normally a white fade is used to symbolise the end of something and a black fade is usually used to symbolise the beginning of something, however this is not always the case. A fade indicates the start or an end to a particular section of time within the narrative.
Finally there is a Wipe. This is the more unusual out of the different transitions and it is when one image is pushed off the screen by another. These images can be pushed in any direction but it is more common for the image to be pushed off the left-hand side, this movement is more consistent with the sense of time moving forward. Using a wipe can be effective as it signals to the audience that they are being shown different locations that are experiencing the same time. It is the visual equivalent of saying 'meanwhile...'. These types of transitions are used a lot in the Star Wars films.
A Graphic Match can also be another way of manipulating diegetic time and space. This is a very special type of transition and it is something an editor adds between two shots but more a decision about which two shots to put next to each other. This graphic match is created when two images that are similar in shape and size are placed next to each other to look like almost the same thing. Using a graphic match tells the audience that there is a very important link between whatever it is they are seeing in the two shots. An example of when this is used is in the film Psycho.

Effects can be used to manipulate diegetic time and space very effectively, they are a very important part of the film industry. They can be used to show that a time period has changed in a flashback/forward, to show a location has changed, and to show that time is moving quicker or slower than normal. However an effect doesn't have to be complicated as it can simply be the use of a colour filter or altering the saturation of an image to either enhance the colour or remove it. When a flashback effect is needed the editor tends to make the image black or white. One common technique is altering the speed of the footage. A good example of this is in the film The Time Machine in which the main character enters the time machine and the environment changes as he travels through time, a similar example is the Time Turner in Harry Potter. There are many different types of effects that can be added in the post production stage of editing to achieve the desired effect.
Wednesday 26 November 2014
Task Eleven - Creating Pace with Cross Cutting
In our video we were able to create pace with cross cutting and by the use of music. The video starts of at a normal speed and we don't expect anything to happen. However as the sequence goes on the editing gets faster and we cross cut between the main characters. We emphasised this effect by adding music with different paces, we used a fairly slow song when the 'villain' was getting ready but we used a faster paced song when the other character overheard the conversation and start to get ready to. By putting these elements together we were able to create pace and tension.
Saturday 8 November 2014
Task Ten - Understanding Pace
Throughout the making of a film the pace of editing can be used to create a range of effects and to engage the audience.
The pace of editing is helpful when trying to engage the viewer. If the audience is not engaged with what is going on then they are unlikely to sit and watch it, and will go on to tell others of their experience. A way to make sure that they are engaged throughout can be done through a number of techniques, for example Speed of Editing. In a film each scene may last a matter of seconds or could continue for minutes but the length of each sequence establishes the pace of the film moving the action along. By using Speed of Editing the audience can determine the mood of what is taking place on screen. If you want the audience to feel anxiety and suspense then the editing is likely to be quick, with each scene lasting a number of seconds for example in an Action movie. However if you want the audience to feel more relaxed then the scenes are likely to be longer, lasting minutes instead of seconds and change less frequently, for example a Romantic comedy. An example where this is used is The Notebook.
Cross Cutting can also be used to create a range of effects. This is when you deliberately cut from one scene to another to create tension or similar effects. This is mostly used when the filmmaker wants to create a sense of drama, this is most commonly used in horror movies, an example is the opening sequence to Scream. Cross Cutting allows the filmmaker to cut from one shot to another, normally to show different things happening simultaneously. This is generally used to build up tension and lead to the climax of the film. An example of this is the opening scene of Scream.
A cutaway shot is an interruption of a continuously filmed action by inserting a view of something else. By itself the cutaway doesn't create a lot of tension, but the editor uses it to make a longer sequence. Switching to another shot that is related to the main storyline helps to make the sequence longer, helping with the Speed of Editing. This relates to the Creating of Pace, making the shots longer helps to make the scene more relaxed and the audience don't expect anything. At this point the pace will be slower. However, if you start cutting from shot to shot the pace will be faster and suspension will start to build.
Finally, the pace of editing is extremely effective with the Development of Drama. Normally when a film has little drama going on then the shots tend to be longer and last a number of minutes. This doesn't create much of an effect within the audience as they don't expect anything bad to happen. This makes it easier for the Development of Drama to begin as the audience will be completely unaware. As the drama builds up, the pace of editing will be a lot faster, with scenes lasting seconds, this helps to create the drama which the director intentionally wanted to happen. Therefore the pace and speed of editing is extremely important when making a good movie.
Friday 7 November 2014
Task Nine - Non-Continuity
Non-Continuity editing is a style of filmmaking that was made poplar throughout the 1950's and 1960's. Filmmakers such as Jean Luc Goddard and Français Truffaut pushed the limits of editing techniques and created a new style called 'The French New Wave'. This style used a carefree editing style and did not conform to the traditional editing etiquette of Hollywood Films. 'The French New Wave' editing often drew attention to itself by it's lack of continuity. It's self-reflexive nature reminded the audience that they were watching a film rather than a portrayal of real life. They often used material that wasn't related to any narrative which kept the audience surprised and intrigued.
A Bout de Soufflé
In this scene from A Bout de Soufflé we see an example of a jump cut when Seberg picks up the mirror and then suddenly it's gone again. Jump Cut's are usually used to startle the viewer and draw attention to something, in this case the mirror in her hand.
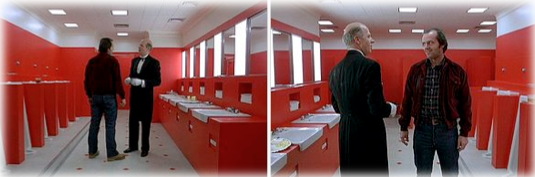
Another example of when the filmmaker uses non-continuity editing is in the film The Shining by Stanley Kubrick where the 180 degree rule is purposely broken to create surprise and confusion within the audience. The use of this break of the 180 degree rule is effective as we can see the characters have swapped places, emphasising the idea that there is a lot of confusion and someone is in danger. The audience becomes startled but intrigued to find out what is going to happen. The breaking of this 180 degree rule is also use in The Hunger Games, by Gary Ross, again to emphasise the idea that there is danger, as if something is inevitably going to go wrong, and that possibly something bad will happen to the main character.
Another example of when the filmmaker uses non-continuity editing is in the film The Shining by Stanley Kubrick where the 180 degree rule is purposely broken to create surprise and confusion within the audience. The use of this break of the 180 degree rule is effective as we can see the characters have swapped places, emphasising the idea that there is a lot of confusion and someone is in danger. The audience becomes startled but intrigued to find out what is going to happen. The breaking of this 180 degree rule is also use in The Hunger Games, by Gary Ross, again to emphasise the idea that there is danger, as if something is inevitably going to go wrong, and that possibly something bad will happen to the main character.


Friday 24 October 2014
Task Eight - Using Continuity Editing Techniques
In our sequence we use a range of continuity editing techniques to create the clip. We put in Match on Action, Shot, Reverse Shot, Eye Line Match and the 180 Degree Rule.
The first use of continuity editing is the Match on Action which we used on the door shot. We see her walking down the corridor towards the door and we see the outside of the door. Then in the next shot the camera has been moved into the classroom and we see the rest of the action but from the inside. I think that we did the Match on Action well as it runs smoothly and is continuous.
We also use an Eye Line Match when the teacher is writing on the whiteboard and then looks away. We see a shot of her writing then immediately after the camera cuts to a shot of the clock. It's hear when we see the object was looking at in the previous shot. I believe that we done this shot rarely well as we do see the teacher looking away and back again, and then we see the clock. However, i think that net time it should be a lot clearer on where a bouts the teacher is looking as some people may not realise that she is looking at the clock but rather looking at something else.
The Shot, Reverse Shot was used when we filmed the conversation sequence. We start of with a shot of the student walking in, then it cuts to a shot of the teacher asking why she's late, then we see the student again. I think that we done the Shot, Reverse Shot fairly well as the camera does cut between the two characters and we can clearly see who's talking to who and when.
Finally, throughout the sequence we have kept to the 180 Degree Rule and have not broken it at any point during the clip. The teacher is always on the right and the student is always on the left and this is continuous throughout.
Friday 17 October 2014
Task Seven - Understanding Continuity Editing
Continuity Editing is the predominant style of film and video editing. The purpose of continuity editing is to ensure temporal and spatial continuity as a way of advancing narrative, using such techniques as the 180 degree rule, Match on Action, and Shot,Reverse Shot. It was developed by early European and American directors, in particular D.W. Griffith in his films such as The Birth of a Nation. Continuity Editing is important as it helps to retain a sense of realistic chronology and generates the feeling that time is moving forward. It doesn't mean you can't use flashbacks or flash forwards, as long as the narrative will still be seen to be progressing forward in an expected or realistic way.
The first type of continuity editing is Match on Action. This is when you start an action in one shot and finish it in the the next. A filmmaker may use this as it creates a continuous shot and you can film the same shot twice and then put them together. By doing two shots you can change the position of the camera without altering the continuity of the shot. An example would be when someone walks through a door. The camera can be placed outside the room filming the character going in, then in the next shot you can move the camera into the room and watch the character entering the room. When using Match on Action, the camera operator and the character must ensure that everything is in the same position in both shots. If a filmmaker didn't use Match on Action to film a shot like this, it would create a jump shot, and therefore it will not be continuous. The audience are likely to get confused if they do not see the full extent of the action.

Another type of continuity editing is Eye Line Match. This is when you see the character looking at something off screen, leaving the audience to wander what they are looking at, then in the next shot the camera cuts to the person or object the previous character was looking at. Filmmakers may want to use this as it creates a sense of mystery within the audience as we are left wandering what the character was looking at. They may also want to use it to create an element of shock and tension. If the audience can't see what the character is looking at then they begin to question the situation and start to formulate their own understandings. If a filmmaker didn't use Eye Line Match then the scene wouldn't create as much tension as we'd be able to see the whole scene just as the characters can.

Shot, Reverse Shot is also a useful style of continuity editing. This type of shot is usually used in scenes where a conversation takes place. It's when the camera changes between faces and we see a shot of one character looking at another character, then we are shown the other character looking back. A filmmaker might want to use this as it makes the audience feel like we are the ones talking to the characters, creating a sense of empathy. Changing the shot creates a focus on the particular characters rather than being shown the whole scene. It keeps the audience engaged with what is going on to. If filmmakers didn't use Shot, Reverse Shot then the audience may start to become bored as it would be one continuous shot throughout. Also, if it isn't used then the audience may not hear important information and this may lead to confusion further on in the film.

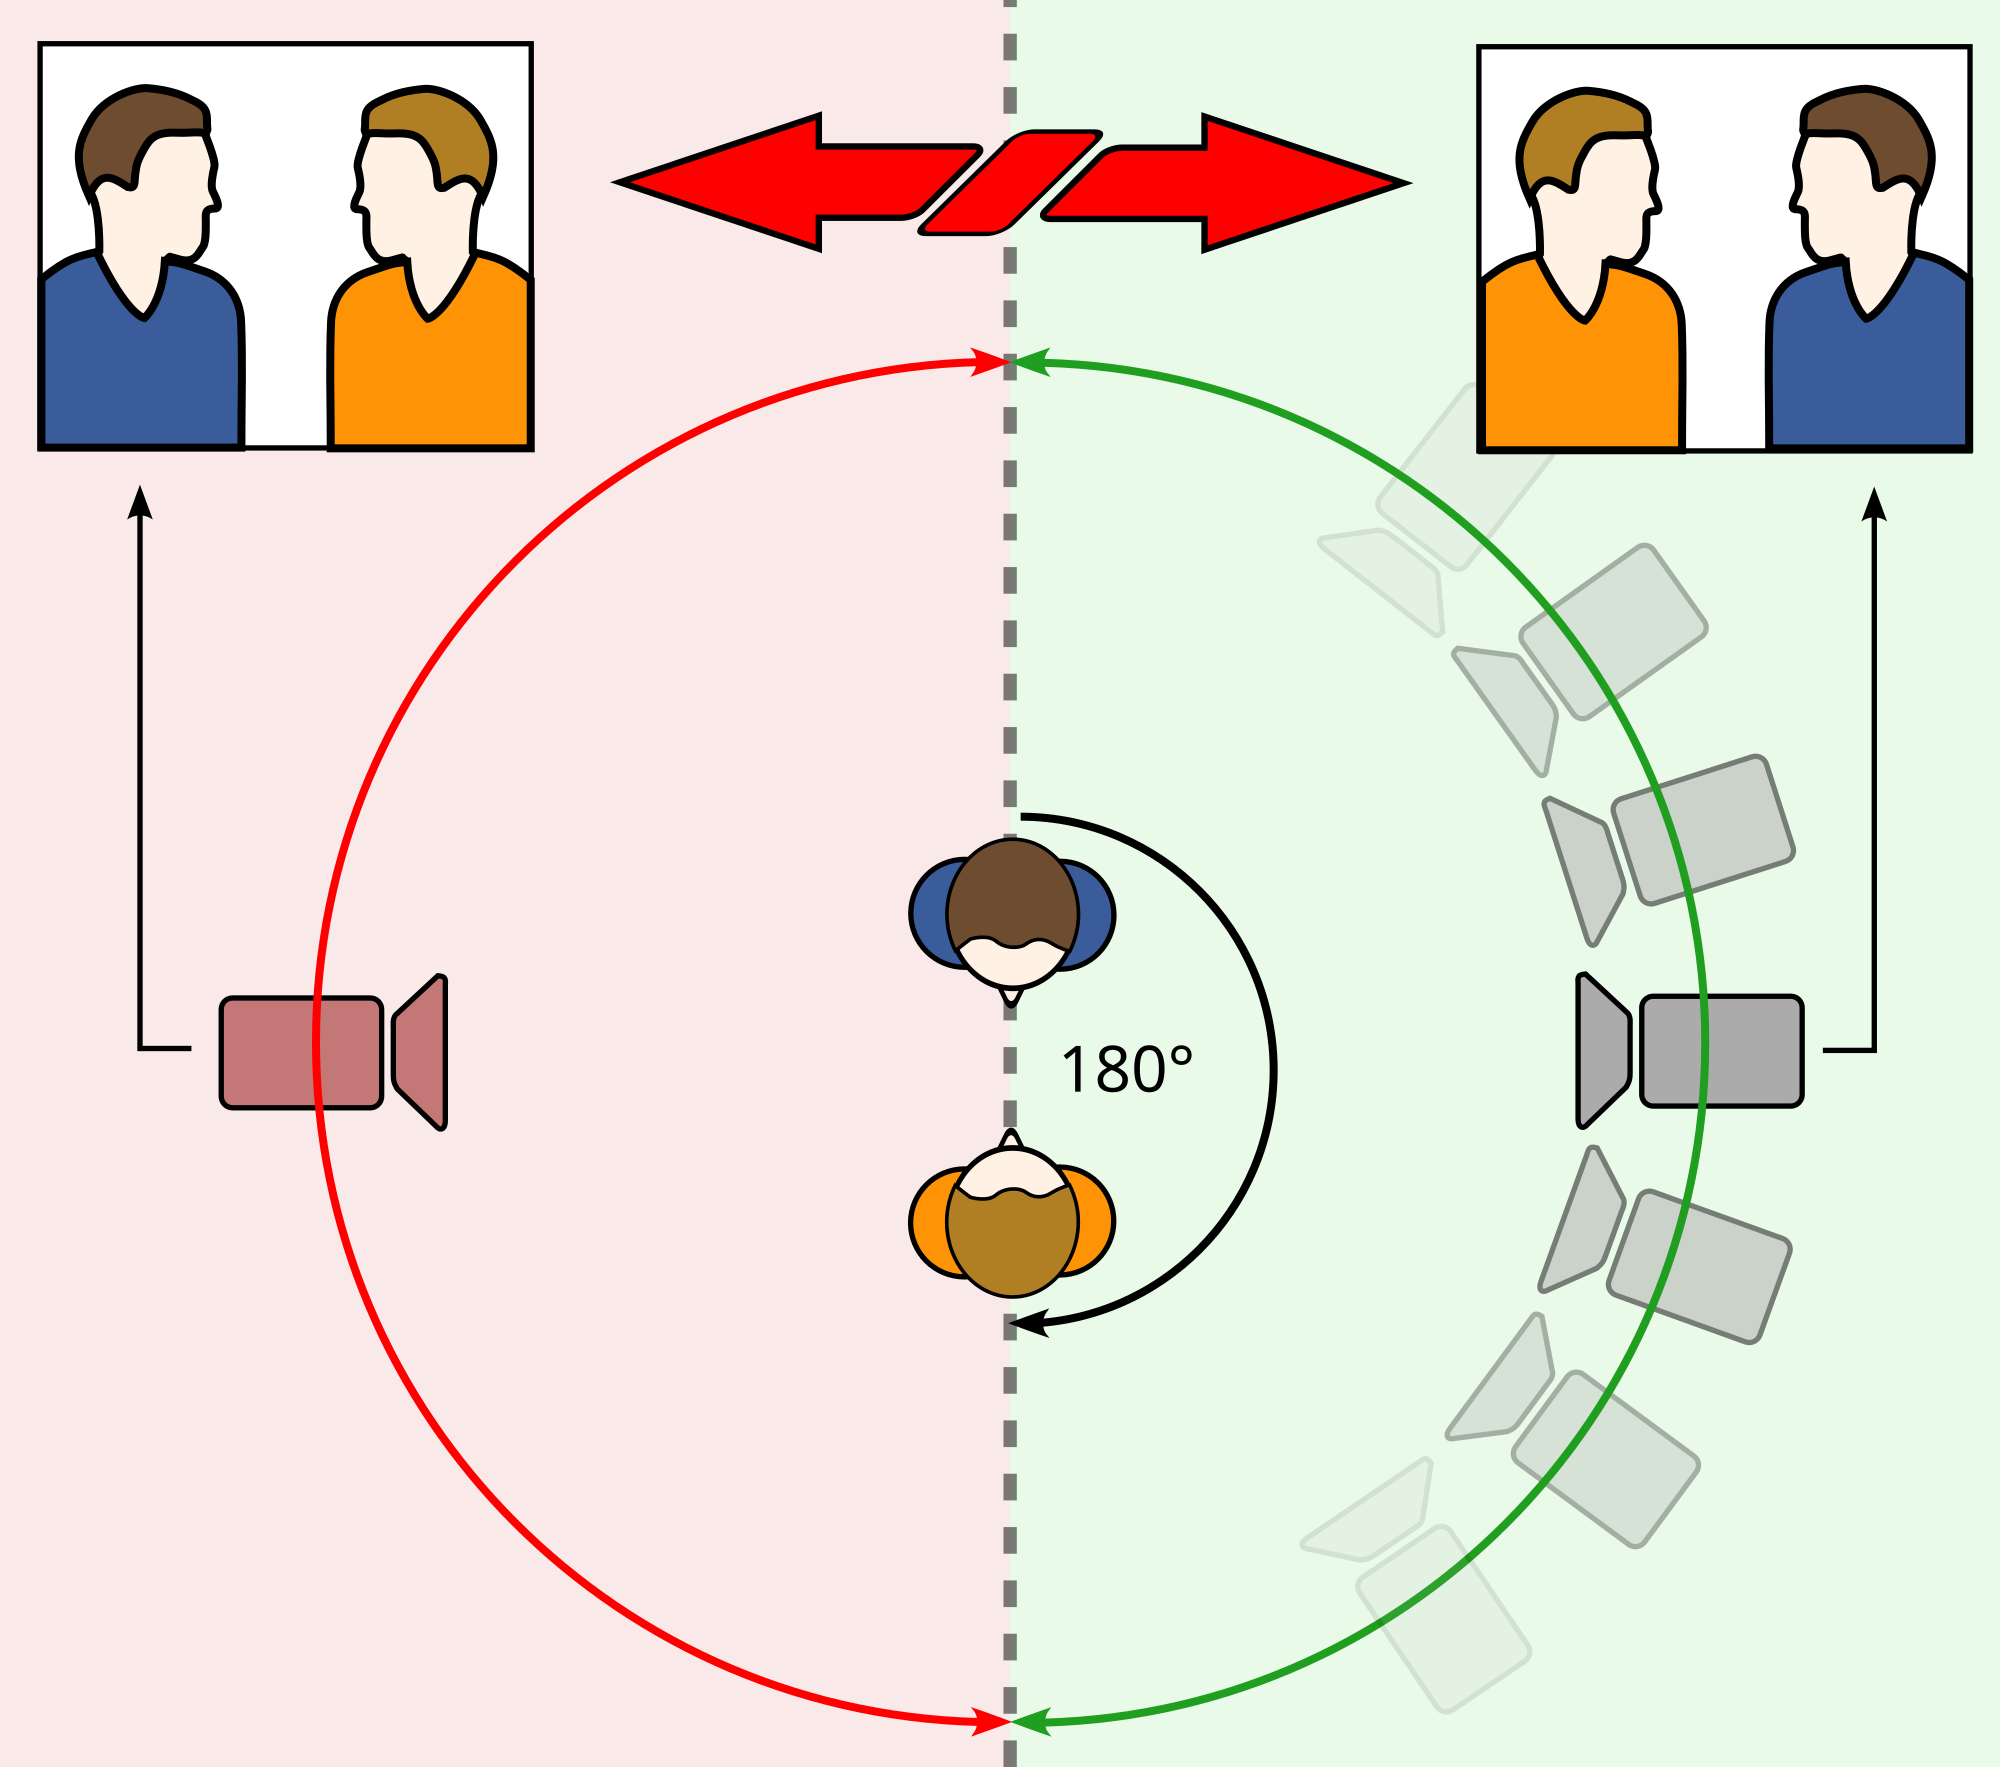
The last technique of continuity editing is the 180 Degree Rule. This is the positioning of the camera in scenes where we see different characters, usually communicating with each other. During this communication the camera operator must make sure that the camera stays on one side of the imaginary axis ensuring that the characters on the left and right stay on the left and right sand don't switch places. Filmmakers may use the 180 Degree Rule to enable the audience to visually connect with the movement happening around the characters. If a filmmaker didn't us it then the scene would create disorientation and confusion within the audience as the perspective is altered. The only time it is suitable to break the rule is if the director purposely wants it broken to enforce confusion and disorient in the audience to foreshadow danger or change.
An example of when this 180 Degree Rule is purposely broken is in The Shining.
The first type of continuity editing is Match on Action. This is when you start an action in one shot and finish it in the the next. A filmmaker may use this as it creates a continuous shot and you can film the same shot twice and then put them together. By doing two shots you can change the position of the camera without altering the continuity of the shot. An example would be when someone walks through a door. The camera can be placed outside the room filming the character going in, then in the next shot you can move the camera into the room and watch the character entering the room. When using Match on Action, the camera operator and the character must ensure that everything is in the same position in both shots. If a filmmaker didn't use Match on Action to film a shot like this, it would create a jump shot, and therefore it will not be continuous. The audience are likely to get confused if they do not see the full extent of the action.
Another type of continuity editing is Eye Line Match. This is when you see the character looking at something off screen, leaving the audience to wander what they are looking at, then in the next shot the camera cuts to the person or object the previous character was looking at. Filmmakers may want to use this as it creates a sense of mystery within the audience as we are left wandering what the character was looking at. They may also want to use it to create an element of shock and tension. If the audience can't see what the character is looking at then they begin to question the situation and start to formulate their own understandings. If a filmmaker didn't use Eye Line Match then the scene wouldn't create as much tension as we'd be able to see the whole scene just as the characters can.
Shot, Reverse Shot is also a useful style of continuity editing. This type of shot is usually used in scenes where a conversation takes place. It's when the camera changes between faces and we see a shot of one character looking at another character, then we are shown the other character looking back. A filmmaker might want to use this as it makes the audience feel like we are the ones talking to the characters, creating a sense of empathy. Changing the shot creates a focus on the particular characters rather than being shown the whole scene. It keeps the audience engaged with what is going on to. If filmmakers didn't use Shot, Reverse Shot then the audience may start to become bored as it would be one continuous shot throughout. Also, if it isn't used then the audience may not hear important information and this may lead to confusion further on in the film.
The last technique of continuity editing is the 180 Degree Rule. This is the positioning of the camera in scenes where we see different characters, usually communicating with each other. During this communication the camera operator must make sure that the camera stays on one side of the imaginary axis ensuring that the characters on the left and right stay on the left and right sand don't switch places. Filmmakers may use the 180 Degree Rule to enable the audience to visually connect with the movement happening around the characters. If a filmmaker didn't us it then the scene would create disorientation and confusion within the audience as the perspective is altered. The only time it is suitable to break the rule is if the director purposely wants it broken to enforce confusion and disorient in the audience to foreshadow danger or change.
An example of when this 180 Degree Rule is purposely broken is in The Shining.
Subscribe to:
Posts (Atom)